
上級試験には、Apexクラスのコード再利用だけでなく、VisualForceの再利用についても問われます。
ちょっと作り方がややこしく、覚えるのに時間がかかったので、備忘も兼ねてメモります。
まずは作り方から
VisualForceテンプレートの作りかたがまずは分からなかったので、開発者ガイドさんの力を借りて同じコードを使用することにしました。
作成の為には、apex:compositionタグ、apex:defineタグ、apex:insertタグを使って実現するみたいです。
まずは、Apexコントローラー。
こちらは、書き方は変わらないので、従来のVisualForceのコントローラのように記述すればOKです。
compositionExample.cls
public class compositionExample{

    String name;
    Integer age;
    String meal;
    String color;

    Boolean showGreeting = false;

    public PageReference save() {
        showGreeting = true;
        return null;
    }

    public void setNameField(String nameField) {
        name = nameField;
    }

    public String getNameField() {
        return name;
    }

    public void setAgeField(Integer ageField) {
        age= ageField;
    }

    public Integer getAgeField() {
        return age;
    }

    public void setMealField(String mealField) {
        meal= mealField;
    }

    public String getMealField() {
        return meal;
    }

    public void setColorField(String colorField) {
        color = colorField;
    }

    public String getColorField() {
        return color;
    }

    public Boolean getShowGreeting() {
        return showGreeting;
    }
}
次にテンプレートとなるVisualForceを作ります。
これをスケルトンテンプレートと言うそうな。
テンプレート用のVisualForceページはというと、apex:insertタグを使用して記述する必要があります。
タグの中身は特に記載は必要ありませんが、必ず名前(name)をつけてください。
ということで、こちらがテンプレートとなる VisualForceページ。
myFullForm.page
<apex:page controller="compositionExample">
    <apex:form >
        <apex:outputLabel value="Enter your name: " for="nameField"/>
        <apex:inputText id="nameField" value="{!nameField}"/>
        <br />
        <apex:insert name="age" />
        <br />
        <apex:insert name="meal" />
        <br />
        <p>That's everything, right?</p>
        <apex:commandButton action="{!save}" value="Save" id="saveButton"/>
    </apex:form>
</apex:page>
最後にテンプレートを呼び出すためのVisualForceページ。
こちらは、apex:compositionタグを使用してテンプレートを呼び出し、apex:defineタグを使用してapex:insertタグ部分に埋め込むコンポーネントを定義します。
myFullForm.page
<apex:page controller="compositionExample">
<apex:messages/>
<apex:composition template="myFormComposition">

<apex:define name="meal">
<apex:outputLabel value="Enter your favorite meal: " for="mealField"/>
<apex:inputText id="mealField" value="{!mealField}"/>
</apex:define>

<apex:define name="age">
<apex:outputLabel value="Enter your age: " for="ageField"/>
<apex:inputText id="ageField" value="{!ageField}"/>
</apex:define>

<apex:outputLabel value="Enter your favorite color: " for="colorField"/>
<apex:inputText id="colorField" value="{!colorField}"/>

</apex:composition>

<apex:outputText id="greeting" rendered="{!showGreeting}" value="Hello {!nameField}.
You look {!ageField} years old. Would you like some {!colorField} {!mealField}?"/>
</apex:page>
結果の表示はこうなる
早速作成したmyFullFormで画面表示してみると。
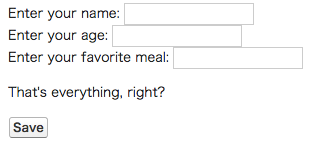
こういう感じの表示になります。
よく見ると、「Enter your favorite color:」の部分がありませんね。
これは、apex:compositionタグの中身がテンプレートに置き換わっていて、テンプレートの中のapex:insertタグにapex:defineタグで指定したコンポーネントが埋め込まれるので、それ以外でapex:compositionタグ直下に記載したコンポーネントはテンプレートに上書きされ無視されてしまうんですね。
なので、apex:compositionタグを使用する場合は、apex:defineタグだけを定義すれば良いことになります。
図解するとこんな感じでしょうか。

まとめ
まとめというより、タグの使い方のおさらいです。
おそらくテストではここさえ押さえておけば大丈夫かと。
apex:compotsitionタグ
テンプレートを呼び出す。templete属性には呼び出すテンプレートのVisualForce名を入れる。
apex:insertタグ
テンプレート側で使用する。テンプレート内で動的に変更したいコンポーネントがある場合に、埋め込む位置にapex:insertタグを記載しておき、呼び出す際にコンポーネントをセットする。複数設置可能、必ずname属性に一意の名前をつける。
apex:defineタグ
apex:compotsitionタグの配下で使用、テンプレートの apex:insert部分に挿入するコンポーネントを定義する。name属性にはapex:insertタグのname属性を指定する。


コメント